This page is part of the official ARCHIVE COPY of the pioneering but abandoned Thrower website on knife throwing.
Complementary pages on KnifeThrowing.info: Grips, Distances, Physics; |
How To Throw Knives
4 November, 1996
THROWING
Throwing imparts two motions to a knife: forward motion and spin.
Forward motion is required to get the knife from your hand to the
target. Spin must be timed so that the knife is travelling point
foremost when it strikes the target.
If you could throw without spin, knife throwing would be a much simpler
skill, wouldn't it? No, it wouldn't, because the spinning motion gives
the knife gyroscopic stability, just the way rifling stablizes a
bullet.
Controlling the spin is the hardest part of knife throwing, at least
for mere mortals like me. The key to controlling the spin of a thrown
knife is consistency. Let me say that again: CONSISTENCY. Many
budding amateurs have given up in despair because they failed to
appreciate the need for consistency.
Achieving consistency begins with practicing each throw using the same
grip, and throwing each time from the same distance from the target.
The grips are outlined below. The correct distance for a given throw
is determined by a little trial and error, helped out with a bit of
arithmetic.
GRIPPING THE KNIFE
A knife is thrown either by the blade or by the handle. A blade grip
is probably a little easier for a beginner, and it's how most people
visualize knife throwing.
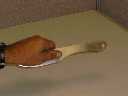
 The vertical blade grip comes naturally and easily. Grasp the knife
blade so that all four fingers come in contact with the steel when
closed. The knife should be gripped far enough up that it can be
controlled with an essentially relaxed hand. To test this, twitch the
knife a few times to make sure that the hilt does not wobble
uncontrollably. Many knife throwers grip with the point of the blade
reaching as far as the first crease of the wrist. The thumb falls into
a natural position with the ball resting on the flat of the blade, or
alternatively (and especially with very wide blades), resting along the
edge. During the throwing motion and through the release, the knife is
held with the blade vertical, that is, with the edge toward the
ground.
The vertical blade grip comes naturally and easily. Grasp the knife
blade so that all four fingers come in contact with the steel when
closed. The knife should be gripped far enough up that it can be
controlled with an essentially relaxed hand. To test this, twitch the
knife a few times to make sure that the hilt does not wobble
uncontrollably. Many knife throwers grip with the point of the blade
reaching as far as the first crease of the wrist. The thumb falls into
a natural position with the ball resting on the flat of the blade, or
alternatively (and especially with very wide blades), resting along the
edge. During the throwing motion and through the release, the knife is
held with the blade vertical, that is, with the edge toward the
ground.
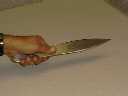
The flat blade grip is also used by some knife throwers, but chiefly
for throwing short distances. This grip resembles the vertical blade
grip, except that the blade is held parallel to the ground. This grip
will tend to impart a more rapid spin to the knife. Because the knife
strikes the target with the flat of the blade horizontal, there is less
tendency to penetrate, especially if the angle of impact is not
precisely perpendicular to the target. Also, because most targets are
made of wood with the grain running vertically, a knife thrown with a
flat grip will encounter more resistance from the target and will tend
to penetrate less. Another, more minor disadvantage is that a knife
flying flat-side-to through the air meets more air resistance, and will
lose velocity over long distances.
 A third type of blade grip, a variation of the flat grip, is used for
throwing a knife with a sharp edge. In this grip, the flat of the
blade rests against the ball of the palm. The tips of the fingers rest
against the flat of the blade, as does the thumb on the opposite side.
Thus the sharp edge never touches the hand. This grip is most
comfortable as a flat grip, although a vertical blade grip can also be
used. Since throwing knives should never be sharpened, this grip will
seldom be called for.
A third type of blade grip, a variation of the flat grip, is used for
throwing a knife with a sharp edge. In this grip, the flat of the
blade rests against the ball of the palm. The tips of the fingers rest
against the flat of the blade, as does the thumb on the opposite side.
Thus the sharp edge never touches the hand. This grip is most
comfortable as a flat grip, although a vertical blade grip can also be
used. Since throwing knives should never be sharpened, this grip will
seldom be called for.
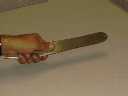
 The handle grip closely resembles the ordinary grip used when cutting.
Grasp the knife with the full length of the handle in the palm, the
fingers closing naturally. The thumb falls into position as in the
vertical blade grip. Comfortable control without exerting much grip is
the goal. During the throwing motion and through the release, the
blade is held vertically.
The handle grip closely resembles the ordinary grip used when cutting.
Grasp the knife with the full length of the handle in the palm, the
fingers closing naturally. The thumb falls into position as in the
vertical blade grip. Comfortable control without exerting much grip is
the goal. During the throwing motion and through the release, the
blade is held vertically.
Professional knife throwers always use vertical grips, whether by the
blade or handle. Amateurs, and especially beginners, should remember
this when experimenting with different methods of throwing.
Gripping the knife with all four fingers will impart a fairly slow
spin. This is desirable for easier control. Within certain limits, a
shallower grip will impart more spin. This is useful when throwing
from uncertain distances. With practice, it's possible to use judgement
to control the spin, through a combination of grip, stance, and arm
motion, to stick knives at a variety of distances from the target. But
it's frustrating to a beginner to try this, and I'll leave the topic
for the chapter entitled "Variations and Stunts."
THE THROWING STANCE AND MOTION
Assume a comfortable standing position facing the target, with the
knees slightly bent and one foot advanced well ahead of the other. A
right-hander should advance the left foot, a left-hander the right
foot, but this is not a hard and fast rule. Grip the knife as
described above. Using a natural overhand throwing motion with plenty of
follow-through, pitch the knife swiftly at the target, aiming at a
point just at eye-level. Release the knife as your arm reaches the
horizontal, allowing the knife to slip smoothly out of your fingers.
There must be no wrist movement at the moment of release. Try always
to release the knife as straight at the target as possible, avoiding
any yaw, which can make an otherwise well-thrown knife miss the aiming
mark by three or four inches. The knife should be thrown hard enough to
follow a flat trajectory to the target, but a violent throwing motion
is undesirable.
Concentrate on using a true overhand motion, with as little sidearm as
possible. This will take some conscious effort, especially when
throwing a very heavy knife.
At first, avoid moving your feet during the windup. Placing your
leading foot exactly on the mark for a given distance is essential for
good practice, and you should develop the habit of taking up your
position precisely. It's worth noting that professional knife throwers
use this method of positioning. You may even find yourself taking a
step backward as you wind up. Later, when you've had some practice at
finding your distance, you can vary your throwing by taking a step
forward during the windup. To get the hang of this, just start your
windup a step back from your throwing mark, and make sure your leading
foot comes down accurately on the mark as you throw. Stepping forward
during the windup will help when throwing tomahawks and extra heavy
knives.
Full follow-through is important, to avoid the common error of
flipping, that is, of halting the throwing motion at the instant of
release. This imparts too much spin to the knife for easy control.
(This kind of throwing motion can be used at short distances when a
quick spin is needed, but is not very useful for throws longer than a
half-turn.)
THE HALF-TURN THROW
In the half-turn throw, the knife is gripped by the blade and makes one
half of a turn on its way to the target. Begin by standing
approximately eight feet from the target, or a little less if you're of
short stature. Throw using a blade grip. Watch closely how the knife
lands. If the knife strikes point first and sticks, it was thrown from
the correct distance. If the knife strikes with the point uppermost,
this means that it did not spin far enough in flight. To correct this,
move back a foot or eighteen inches and try again. If the knife
strikes with the handle uppermost, this means that it spun too far in
flight. To correct this, move forward a foot or eighteen inches and
try again. When you find the distance from the target at which your
knives stick consistently when thrown one-half turn in a way that's
comfortable for you, mark the spot: drive a stake in the ground, build
a cairn, hire someone to stand there with a flag, but mark that spot,
and always practice half-turn throws from there.
Take the trouble to measure your half-turn distance with some care,
because it's used to calculate your basic half turn, a handy unit for
measuring all knife throwing distances.
Here's how to calculate your basic half turn. Let's say that you stand
with your leading toe nine feet from the target when throwing a half
turn. Now subtract the length of your arm at full stretch during the
throwing motion, that is, at the point where the knife is released.
This factor may be a little hard to estimate, but will probably be
about three feet. Three subtracted from nine equals six, and so six
feet is your basic half turn.
THE FULL-TURN THROW
In this throw, the knife is gripped by the handle and spins through one
full turn on its way to the target. To find your distance for a
full-turn throw, multiply your basic half turn by two and add the
length of your arm:
6 feet x 2 = 12 feet + 3 feet = 15 feet
Thus the correct distance to stand from the target for a full-turn
throw is fifteen feet. Many people get puzzled over this little piece of
arithmetic. "Why don't I double my half-turn distance and stand
eighteen feet from the target?" they ask. Answer: because you have to
allow for the length of your arm at full stretch.
I was puzzled by this myself for many years, and owe my enlightenment
to Harry McEvoy of Grand Rapids, Michigan, the manufacturer of Tru-Bal
throwing knives, one of the really good lines of throwing knife on the
market.
Failure to take arm-length into account has led some writers on knife
throwing into a curious error: the belief that a knife begins to spin
faster after it's travelled a certain distance. If this were so, we'd
have perpetual motion. Of course, the rate of spin of a thrown knife
doesn't decrease as fast as its forward speed, so in a very long toss
a knife would tend to spin more times over a given distance; but this
factor can be dismissed at ordinary ranges.
THE TURN-ANA-A-HALF THROW
This throw is made with a blade grip, as in the half-turn throw. The
knife spins through one and one-half turns before striking the target.
The correct distance is three times your basic half turn plus the
length of your arm:
6 feet x 3 = 18 feet + 3 feet = 21 feet
This is quite a long distance to throw a knife, and should keep you
busy learning for some time. But don't be afraid to try the
TWO-TURN THROW
This is thrown using a handle grip, as in the full-turn throw. The
knife spins through two full turns before striking the target. The
correct distance is four times your basic half turn plus the length of
your arm:
6 feet x 4 = 24 feet + 3 feet = 27 feet
This will require a powerful, precise throw.
Remember that the more times a knife spins on its way to the target,
the more times any error will be multiplied. Remember also that a
successful throw requires a combination of correct forward speed and
correct spin. Within broad limits, the speed with which a knife is
thrown does not affect the amount of spin. Thus a knife that travels
too fast will not have time to complete the correct number of turns to
strike the target point-first. Many a time have I pitched a sticker
violently (usually in frustration over bad practice) and seen it strike
point uppermost, because it reached the target too soon to spin far
enough. At other times, I've thrown too gently and seen the knife spin
too much and strike handle-first. Consistency, I said.
Remember also that the above formulas for finding the correct throwing
distances are approximate. Many factors can combine to vary the
theoretical throwing distances: slight changes in stance, the extra
effort required to throw farther, the different spin given to a knife
by handle vs. blade grip, etc. Use the formulas to get approximately
the right distances. Then vary the distances a little by trial and
error until you can throw comfortably, and mark your own personal
throwing spots.
The blade grip seems to be a little more accurate than the handle grip,
and it's usually favored by performers. Professional knife throwers
use the half-turn throw (the shortest one) for particularly difficult
and dangerous feats. They tend to use the turn-and-a-half throw for
many of their other stunts. There's something really satisfying about
a turn-and-a-half throw: the distance is great enough to offer some
challenge, but not so great as to make throwing impossibly difficult.
After you've learned to throw reasonably well in a variety of ways, you
may settle down to steady practice at a turn-and-a-half.
STICKING SOLIDLY
When a knife doesn't stick in the target and stay there, the throw is a
failure. In competitions, you get only a few throws, or even one
throw, and the knife that fails to stick might as well have missed the
target altogether.
Here's a little tip: Try to make your blade strike the target in a
slightly handle-down attitude. The spin will tend to turn the knife
deeper into the wood, embedding it solidly so that it stays put. A few
degrees of handle-down is enough for most knives. But note the extreme
Bowie type illustrated in the chapter "Knives." This knife is thrown
exclusively with a handle grip, with the main edge uppermost. It's
intended to strike the target with the handle as much as thirty degrees
below the horizontal. That extremely curved Bowie point hooks into the
wood and stays there. This design was given me by John Marotzke, who
has won many a ham and turkey with his knife and tomahawk tossing in
buckskinner competitions. He got it from a professional carnival
performer; and the pros can't afford to have knives dropping out of the
target any more than you can.
Mail to mjr, goto
How to throw,
Survival, or back to
Thrower
| This page is part of the official ARCHIVE COPY of the pioneering but abandoned Thrower website on knife throwing. |