This page is part of the official ARCHIVE COPY of the pioneering but abandoned Thrower website on knife throwing.
Complementary page on KnifeThrowing.info: Targets |
(3) Knife Target Construction
Indoor vs. Outdoor
Nothing is so problematic about knife throwing as targets. Knives and
axes rip up just about anything they are thrown at. They damage targets
whether they stick in them or not. When a knife sticks in a target it
makes a hole. Depending on the shape of their point, some knives make
bigger holes than others. Big or small, eventually, two holes overlap,
and then again, and this begins the process of cutting up the wood.
A knife does even more target damage when it fails to stick, but
instead, when it JUST misses. On many throws that are just a little too
far or a little too close to the target, the point penetrates the target
material, but the handle has gone too far over, or not far enough to
stick. Instead, the handle of the knife is slammed flat against the
target, and the point comes out of the material, gouging out a
considerable chunk of it.
For this reason, one wants the target material to be easily and
inexpensively replaceable.
Indoors
There might be a few knife throwers in the world who have vast room
indoors and can construct an outdoor style throwing range. Most of the
time, throwing indoors means restricting oneself to smaller knives and
targets that don't shred all over the carpet. There is also the matter
of the knife bouncing off of hard target material and denting the walls
or wooden floor. None of the indoor targets suggested below suffer from
these problems.
A 10 x 10 room has a 14 foot diagonal from one corner to another. A 4 x
4 target hung from the ceiling in the corner of the room will stick out
from the corner by a couple of feet. Given the need for space to swing
your arm and stance, such a room limits throws to about 9 feet, but
that's more then a half turn for most knives, or a full turn with a
pinch hold (see Holds & Throws chapter) with a little extra wrist.
For some people this may not be enough to make the sport interesting. If
indoor throwing is all you have, then perhaps some other sport would be
more satisfying. As an adjunct to outdoor throwing however, an indoor
target can be of great value, perhaps an off-season exercise, or a way
to hone the eye/hand for fine accuracy, etc. If you are lucky enough to
have a 12 x 12 room, you would have a 17 foot diagonal, room for a 12
foot range, enough for full turns of small to medium sized knives.
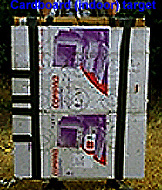
Cardboard is the most commonly seen indoor target material. Use the
corrogated cardboard one finds commonly in super-market boxes, and all
kinds of shipping cartons. Generally speaking, the bigger and thicker
they are the better, but remember you have to stand it up or hang it so
over-all size and weight might grow too large to be practical.
Flatten the boxes, and pile one atop another like a stack of pancakes.
Put enough together to make a 4 inch pile (at least). Measure it with
you kneeling on top of the pile to press it together. Tape the whole
thing together with duct tape. You need go around only in the direction
that will be the vertical one when the flattened pile is standing or
hanging. Now draw a target in the middle of it, step back, and have at
it.
 You will notice after you stick a few dozen that the cardboard begins to
tear and pull in the places most often hit. Chunks start flapping like
doors on hinges, and knives bounce off once in a while, even when they
strike point first. You can turn it over and use the other side too, but
the back side will deteriorate even faster then the front since several
layers of material will have been demolished already. So you start
throwing more at the corners or other parts of your target, but
eventually, it gets used up and must be replaced. I have discovered the
following variation that helps with this problem.
You will notice after you stick a few dozen that the cardboard begins to
tear and pull in the places most often hit. Chunks start flapping like
doors on hinges, and knives bounce off once in a while, even when they
strike point first. You can turn it over and use the other side too, but
the back side will deteriorate even faster then the front since several
layers of material will have been demolished already. So you start
throwing more at the corners or other parts of your target, but
eventually, it gets used up and must be replaced. I have discovered the
following variation that helps with this problem.
Make the carboard target as above, including the taping. Now make
another target like the first, only about 1 inches deep, and then hang
it, with more tape, to the first 4 inch wide target. Paint your bulls
eye and throw, notice what happens... As the top inch of your
target get chewed up, the knives begin to penetrate the lower 4 inches,
but only a little bit, and only in nice neat holes, because the upper
inch absorbs most of the cutting and tearing. After a while, you take
the top inch off the target (remember it is hung separately) and you
will find the lower 4 still perfectly useable. In this way, you only
need replace the top inch every couple of hundred throws (or more if
the target was large and had a lot of room on it to begin with). The
lower 4 inches will last through 6 or more such cycles before it has to
be turned over.
One of the best cardboard target materials I have found is the boxes
used to ship personal computers and large office devices like printers,
fax machines, etc. If you're not working for such a place, call around.
Chances are there's some company within 25 miles that is upgrading and
has lots of computer boxes to get rid of. Otherwise, supermarkets are a
good source of material, but these make smaller targets usually. That
may be all you have room to set up anyway, but the larger boxes can also
be cut down to fit any size requirements.
One thing to note with cardboard is that you are pretty much limited to
the smaller (6 - 7.5 inch) knives. Larger knives begin to break it up so
quickly, or actually penetrate (if they are sharp or heavy) 6 inches or
more in one or just a few strikes, that it becomes impractical as a
target material.
Celophane
One other possibility for an indoor target is celophane. It can be found
rolled into spools three feet across which are then cut into sections
maybe 6 inches thick. You will find this stuff at archery supply
outlets. A section can be mounted on a wooden support, or hung from the
ceiling etc. When a knife strikes the celophane spool it penetrates and
pushes the celophane aside much as it does the grain in a wooden beam.
The near misses described above do little damage as the celophane will
stretch as it is pulled. Some will break, and over time, some will
become cut and fall out in small pieces, but a single target should last
many months. The material also absorbs missed hits. Slaps that would
cause the blade to bounce just drop to the floor. Of course it is
possible to throw past the target, so something should be hung on the
walls behind it.
This last consideration is especially important when one consider
another of celophane's advantages. Unlike cardboard, it will survive
faily large knives.
 Other suggestions for indoor targets include phone books pressed
together with clamps. One throws at the edges of the books so the
knives can penetrate between the pages. I have not tried this idea,
but it sounds good. It is probably impractical to hang a thick
collection of phone books on the wall, but if you have something
convenient to mount them on, it would probably work.
Other suggestions for indoor targets include phone books pressed
together with clamps. One throws at the edges of the books so the
knives can penetrate between the pages. I have not tried this idea,
but it sounds good. It is probably impractical to hang a thick
collection of phone books on the wall, but if you have something
convenient to mount them on, it would probably work.
Outdoors.
Most knife throwing takes place outside. We assume that wood chips
litering the ground is not a problem. Wood makes the best target
primarily for aesthetic reasons. While there is an alternative
(celophane described above), it does not make the characteristic sound
of wood well struck. Wood is also more flexible in terms of the size and
shape of the target. Wood of the sort required isn't always or
everywhere available, and it may not be inexpensive.
The traditional wooden target is a burl, a section of a tree trunk.
Ideally, they should be as wide as possible, even up to three feet or
more in diameter, and cut as much as two feet or more thick. Assuming
you have to tools to cut this stump yourself, you can resurface your
target when it needs it with another cut, until the whole is too thin to
be useful. At this point, the search begins for another trunk.
The big trouble with tree trunks is that they are not readily available
everywhere, especially if they have to be three feet in diameter! I
suppose one of the perks of becoming a better knife thrower is requiring
a smaller target. Yet even two foot trunks are hard to come by in many
places.
One wants a target to be as large as possible. I find that I can throw
to within 6 or 7 inches right or left of a center line from about 12
feet 85% of the time, 90%+ if I'm warmed up and not tired. From 20+
feet, my 85% would put me within 12 inches of the center line. I
rarely throw more then 15 inches from the center to the left or right,
but up and down, my throw can vary as much as 24 or 30 inches from its
intended destination - usually when I'm tired. Now this is after more
then a year of practice. Most people are probably better than this, and
could achieve these tolerances in half that time or better. If my target
is a three foot circle (pretty big by stump standards), I will miss my
target entirely, usually above or below it, one or two out of every ten
throws. That means I am throwing the knife into something else, the
dirt, a tree, or something, all to often. Now I'm a tad better then this,
but there was a time...
So I knew the trick was to get some large face of wood that wasn't
plywood. Plywood is not a good knife target material. It tends to break
smaller knives, and it itself fractures and comes apart in layers when
hit with larger knives. It is too hard, and there is no grain to open up
to the knife. One wants to throw into a definate grain. Moreover, since
the knife is ideally to be spinning vertically, the grain should go
up/down rather then left/right
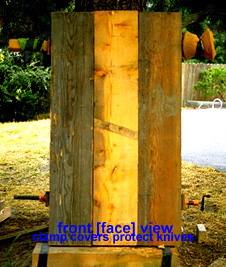
After considerable experimentation, I invented the target to be
described next. My goal was to construct something that would survive
several months of throwing with heavy knives and axes, with a
replacement cost at that time under $50. It was also to be as convenient
as possible to disassemble and reassemble with new wood. A further goal
was that there should be no metal inside of it for any knife point to
strike. This ruled out nails or screws in its construction.
I had experimented with 2 inch thick boards made from Douglas Fir. Fir
is a medium wood, ideal for throwing almost anything. There are
equivalents in most parts of the country. Two inches proved
unsatisfactory. It withstood only the small to medium knives (up to 11
inches and 1/2 lb), and even those for only a few weeks of hard
throwing. They were relatively easy to cut up and re-configure using a
second board to mount on, but they broke up too quickly when I began to
throw the bigger knives at them. There wasn't an easy way to hold these
together side-by-side to make anything wider then 12 inches, not without
nails or screws, etc.
I found a lumber yard that had the same Fir in 4 inch thick and 12 inch
wide beams. The good stuff was $5.00/foot, but they also stocked this
stuff called "utility wood", or "header stock". It was cracked and
otherwise unsuitable for any permanent use, but it was only $2.20 a
foot. Three six foot beams cost me about $40. As I got better I shortened
the beams to five and then four feet dropping the cost under $30. As
you'll see, the cracks don't matter much in this application. The next
acquizition was two pair of 3/4 inch pipe clamps, and two pieces of 3/4
inch pipe, threaded, about 42 inches long. The clamps and pipe were
about $30.
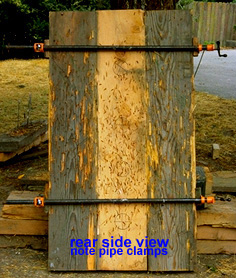 Lay the beams next to one another on flat ground. They should be laid
so that their foot is a few inches from what ever it is the whole
assembly is going to stand against. In my yard, there is a big strong
tree to use. Consider also a large (6 or 8 inch) steel pipe set a few
feet down in concrete. Use other boards or what ever you need to make
the beams lay absolutely parallel to one another. There should be no
places along the boundary between the beams where one is higher than
another. If this can not be helped, move the beams so that the
differences are greatest at one end or other, and not in the middle. Put
the pipe clamps on their pipes, and place each across the three beams
about a foot or 18 inches from either end. I found it best to find four
little blocks of wood 1/2 to 1 inch thick to use as pads between the
beam and the actual metal of the pipe clamp. The clamp ends are only a
couple of square inches in area; the wooden pads help to distribute the
crushing force of the clamps.
Lay the beams next to one another on flat ground. They should be laid
so that their foot is a few inches from what ever it is the whole
assembly is going to stand against. In my yard, there is a big strong
tree to use. Consider also a large (6 or 8 inch) steel pipe set a few
feet down in concrete. Use other boards or what ever you need to make
the beams lay absolutely parallel to one another. There should be no
places along the boundary between the beams where one is higher than
another. If this can not be helped, move the beams so that the
differences are greatest at one end or other, and not in the middle. Put
the pipe clamps on their pipes, and place each across the three beams
about a foot or 18 inches from either end. I found it best to find four
little blocks of wood 1/2 to 1 inch thick to use as pads between the
beam and the actual metal of the pipe clamp. The clamp ends are only a
couple of square inches in area; the wooden pads help to distribute the
crushing force of the clamps.
Now crank down on the clamps, enough even to slightly bow the 3/4 inch
steel pipe. You want these beams to be held together very tightly. Once
the clamps are set, go to the head end of the board and lift them all up
against what ever it is that will hold them. If you build the holding
pole, you might arrange for something of a pulley on top to assist with
lifting the beam assembly. The full six foot target weighs about 200
pounds, but at four feet it weighs in at a more comfortable 130.
 Once it is stood up, take some heavy cord, nylon, or what ever sort of
small rope, and tie it from one pipe end around the holder to the other
pipe end. For saftey sake, tie both the top and bottom off, and make it
strong enough that it won't just fall if hit from behind because the
string breaks. Your target is now ready to be decorated (with targets)
and used.
Once it is stood up, take some heavy cord, nylon, or what ever sort of
small rope, and tie it from one pipe end around the holder to the other
pipe end. For saftey sake, tie both the top and bottom off, and make it
strong enough that it won't just fall if hit from behind because the
string breaks. Your target is now ready to be decorated (with targets)
and used.
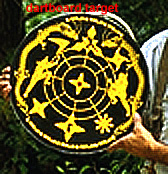
Making The Bulls Eye:
This part is easy. You can use some dabs of common white glue to put
up paper targets, or paint them on with brush, spray can, or other
means. Most often I just draw them with my kid's crayons or a felt
tip permanent marking pen. My six foot target had 3 targets on it,
high, middle, and low. The four foot version has room for two, maybe
three again when I get that good.
Problems:
When the boards get very chewed up, you turn them over. The center
board will need to be turned and also replaced (one hopes) more often
than the outer ones. I find as my throwing gets better that I turn
the boards only once ever six weeks to two months, and that's with
practicing every day. Once they are gone on both sides, you can cut
them up and use them as fire wood.
The biggest problem is that well chewed boards will loose their
ability to stand against one another evenly when the pressure of the
clamps is applied. As you try to lift the board and clamp assembly
into place, the whole may fall appart because the clamps cause the
used boards to bow inwards towards the pipe. This was a serious
problem because it caused me to replace boards more often than
should have been necessary. I finally found a solution in an
inexpensive little device called a "corrugated nail". This is a
small piece of corrugated steel sharpened on one edge. It is meant
for joining together two flush pieces of wood like the corners of a
picture frame. What you do is squeeze your frayed wood together from
the front with pipe clamps, and connect the boards at the top and bottom
(in the back of the target) with the corrugated nails. When they are
so connected, remove the pipe clamps from the front and put them
back on the back to add some extra support. Now lift the target into place.
In an experiment with some very frayed wood, the corrugated nails held
the target in place long after I would otherwise have had to discard
the beams, although the boards did tend to split near their edges after
a while leaving the nails holding nothing at all.
The solution turned out to be duct tape. I had tried duct tape alone on
frayed boards, and while it helped, it would streatch eventually, and
the boards would begin to slip forwards and backwards. As it turns out,
a combination of duct tape and corrugated nails is ideal! The
duct tape prevents the wood from splitting around the nails, and the
nails prevent the wood from sliding back and forth!
Other Designs
The target described here is of my own design. Knife throwers have
been inventing creative target solutions for a long time. Other
designs can be found in books by Gil Hibben, Harry McEvoy, Blackie
Collins, and others.
Mail to mjr, goto
Survival, or back to
Thrower
| This page is part of the official ARCHIVE COPY of the pioneering but abandoned Thrower website on knife throwing. |